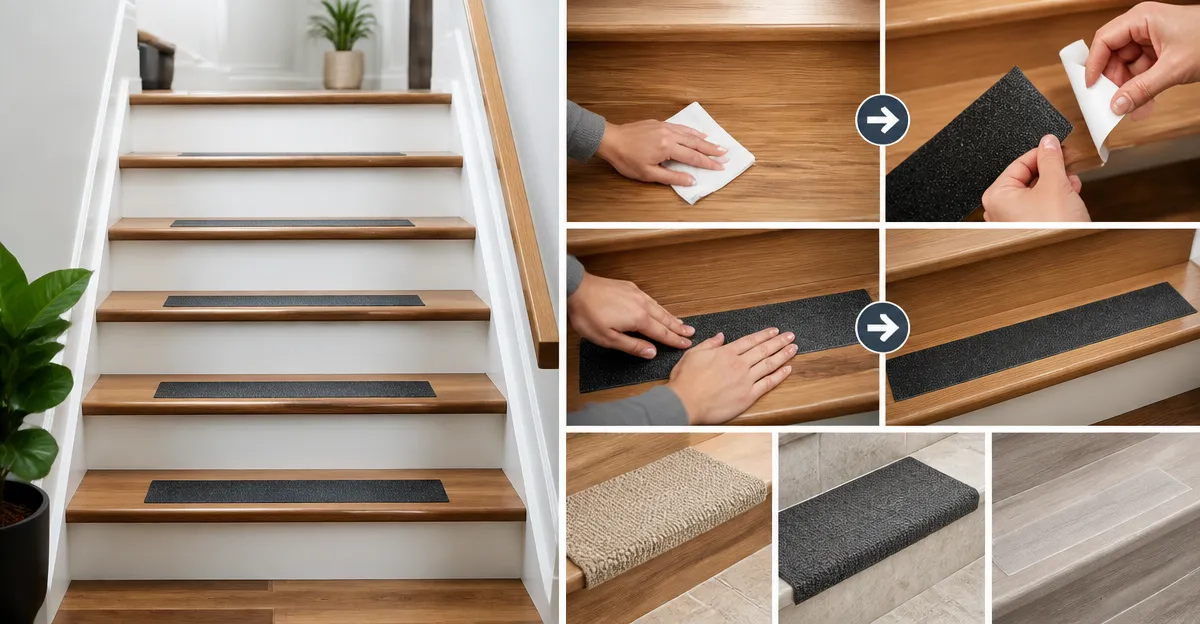
How to Install Anti-Slip Treads Without Damaging the Finish — Safe, Damage‑Free Methods for Wood, Tile & Laminate
Introduction
One will learn a systematic approach to adding anti‑slip protection to stairs while preserving the original finish. The guide emphasizes methods that avoid permanent adhesives, excessive scraping, or surface discoloration. Readers will understand how to select the appropriate material for wood, tile, or laminate substrates. The result will be safer stairways for families, pets, and elderly occupants without compromising aesthetic value.
Professional installers often rely on specialized tapes and carpet treads that balance traction and removability. By following the steps below, a homeowner can achieve comparable results using readily available products. The process integrates preparation, measurement, material selection, application, and final inspection. Each phase includes recommendations from reputable manufacturers with proven customer satisfaction.
What You’ll Need
- Cleaning supplies: mild detergent, soft‑bristle brush, lint‑free cloth.
- Measuring tape and a pencil for marking.
- Utility knife or sharp scissors for trimming.
- Roller or a flat wood block to press adhesives.
- Anti‑slip products such as LifeGrip Anti-Slip Tape 4\" x 15', LifeGrip Anti-Slip Tape 4\" x 38', MBIGM Carpet Stair Treads, KOOTETA Stair Treads, and SMILOOT Clear Non‑Slip Stair Treads.
- Optional: painter’s tape to protect adjacent surfaces.
Step 1: Clean and Inspect the Stairs
The first action is to remove dust, grease, and loose debris from each stair tread. Use a mild detergent mixed with warm water, apply with a soft‑bristle brush, and rinse with a clean damp cloth. Allow the surface to dry completely; moisture can interfere with adhesive bonding. During inspection, note any cracks, loose boards, or uneven edges that may require repair before applying anti‑slip material.
Cleaning ensures that the acrylic adhesive on the LifeGrip tapes forms a waterproof bond to smooth surfaces such as wood, tile, or laminate. The PET‑based construction of the tape tolerates extreme temperatures, making it suitable for indoor environments that may fluctuate. A clean surface also prevents the residue that can occur when low‑quality adhesives are used on unfinished finishes.
Step 2: Measure and Mark Placement
Accurate measurement is essential to achieve a professional appearance and to avoid waste. Measure the width of each tread and subtract a half‑inch from each side to allow a small margin that prevents edge lifting. Mark the start and end points with a pencil, creating a faint guideline that can be removed after installation.
For staircases with varying tread depths, record each measurement individually and cut the material accordingly. Using a utility knife or sharp scissors, trim excess tape or carpet treads to match the marked dimensions. This step reduces the likelihood of over‑hang, which can cause peeling or damage to the stair finish.
Step 3: Choose the Appropriate Anti‑Slip Material
LifeGrip offers two tape lengths that differ primarily in coverage and price. The LifeGrip Anti‑Slip Tape 4\" x 15' costs $7.99 and provides 15 feet of high‑traction surface, ideal for a short flight of stairs. Its PET construction delivers durability, while the 80‑grit aluminum oxide pad supplies a subtle texture that protects children, elders, and pets.
For larger staircases, the LifeGrip Anti‑Slip Tape 4\" x 38' at $11.99 offers extended length, reducing the need for multiple rolls. Both tapes have a rating of 4.6 out of 5 stars from over fourteen thousand reviews, indicating consistent performance across indoor and outdoor applications.
When a softer, carpeted feel is desired, the MBIGM Carpet Stair Treads provide an 8" × 30" polyester‑fiber layer with a TPU non‑skid bottom. Priced at $41.99 for a fifteen‑piece pack, these treads are washable and leave no residue, making them suitable for households with pets or high foot traffic.
For a balance between durability and aesthetic neutrality, the KOOTETA Stair Treads cost $39.99 and feature TPR self‑adhesive technology that adheres without permanent glue. Their polyester surface reduces noise and adds a modest cushion, while the easy‑remove backing protects the original stair finish.
Finally, the SMILOOT Clear Non‑Slip Stair Treads are transparent, preserving the visual character of hardwood or tile. At $8.09 for a five‑pack, they offer a discreet solution that can be rolled out with an included roller to eliminate air bubbles. Their PEVA composition is free from PVC and chlorine, ensuring a safe environment for children and pets.
Step 4: Apply Tape or Treads
Begin by peeling a small section of the backing from the chosen tape or tread, exposing the adhesive. Align the exposed edge with the pencil guideline and press firmly, working from the center outward to avoid trapped air. Use a roller or a flat wood block to apply even pressure across the entire surface, ensuring the acrylic adhesive bonds securely to the clean substrate.
If installing carpet treads, remove the protective film and position the tread so that the decorative side faces upward. Press the tread onto the stair, then walk across the surface to confirm adhesion. For any excess length, trim with scissors, being careful not to cut the adhesive backing.
When using clear SMILOOT strips, place the tape approximately half an inch from the stair edge, then peel the backing while simultaneously rolling the strip with the provided roller. This method eliminates bubbles and guarantees a uniform grip pattern. The transparent nature of the product allows the underlying wood grain or tile pattern to remain visible.
After all treads are applied, revisit each stair to verify that the edges are sealed and that no lifting occurs at the corners. If a corner begins to lift, re‑press with the roller and ensure the surface is free of dust.
Step 5: Secure Edges and Finish
To protect the perimeter of each tread, apply a thin line of painter’s tape along the stair edge before installation. Once the anti‑slip material is in place, remove the painter’s tape to reveal a clean, finished border. This technique prevents adhesive from contacting the stair riser, which could otherwise cause staining.
For tape installations, consider adding a discreet strip of decorative tacks at the four corners, as suggested by several LifeGrip users. The tacks provide additional mechanical grip without compromising the tape’s integrity, especially in outdoor or high‑humidity environments.
Finally, conduct a load test by walking up and down the stairs with both shoes and bare feet. Observe any areas where the material feels loose or where the adhesive may be insufficient. Address any concerns immediately to avoid long‑term damage to the stair finish.
When the installation meets the desired safety standards, clean the surrounding area and store any remaining material for future repairs. Proper storage in a cool, dry place prolongs the lifespan of PET‑based tapes and carpet treads.
Tips & Pro Tips
- Always test a small section of adhesive on an inconspicuous area to confirm compatibility with the stair finish.
- Work in a well‑ventilated space; although the adhesives are low‑odor, fresh air reduces any potential irritation.
- For laminate stairs, avoid excessive moisture during cleaning, as water can seep into seams and affect adhesive performance.
- When trimming tape, use a straight edge to achieve clean cuts and maintain a professional appearance.
- Consider applying a silicone‑based sealant along the edges of carpet treads for added water resistance in bathrooms.
Troubleshooting
Problem: Tape begins to peel after a few days.
Solution: Ensure the surface was completely dry before application; lightly sand glossy finishes to improve adhesion, then re‑apply.
Problem: Carpet treads shift when walking.
Solution: Press the tread with a roller for at least 30 seconds per square foot, and verify that the backing is fully exposed.
Problem: Clear strips appear cloudy.
Solution: Clean the stair surface with isopropyl alcohol before installation to remove any residue that could affect transparency.
Conclusion
One now possesses a complete, damage‑free method for installing anti‑slip treads on wood, tile, or laminate stairs. By following the preparation, measurement, material selection, application, and finishing steps, safety is enhanced without compromising the original finish. The recommended products provide reliable traction, easy removal, and durability across a range of environmental conditions. Implementing these practices will protect families, pets, and elderly occupants while preserving the aesthetic integrity of the home.
Products Mentioned in This Guide
Frequently Asked Questions
What is the safest way to install anti‑slip treads on wood stairs without harming the finish?
Use a removable double‑sided carpet tape and a mild detergent‑cleaned surface, then press the tread firmly and trim excess for a damage‑free fit.
Can anti‑slip treads be applied to tile or laminate without permanent adhesives?
Yes, choose self‑adhesive vinyl or rubber treads designed for tile/laminate that use a peel‑and‑stick backing that removes cleanly.
How do I prepare the stair surface before applying anti‑slip treads?
Clean the stairs with a mild detergent, scrub with a soft‑bristle brush, rinse, dry thoroughly, and ensure the surface is lint‑free.
Will installing anti‑slip treads affect the stair’s appearance or color?
When using clear or color‑matched treads and non‑abrasive cleaning, the original finish remains visible and unchanged.
How can I remove anti‑slip treads later without damaging the stair surface?
Gently heat the tape with a hair dryer, peel the tread off slowly, and clean any residue with a mild adhesive remover.