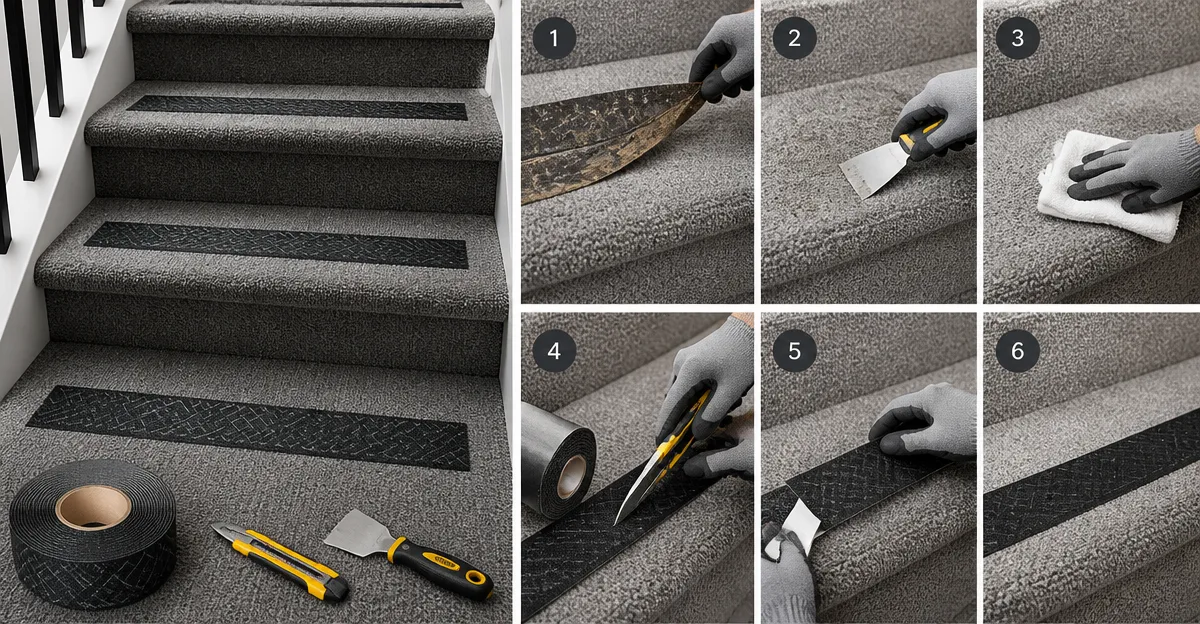
How to Replace Worn LifeGrip 3M Stair Tape on Carpeted Stairs — Step-by-Step Guide
Introduction
Carpeted stairs can become hazardous when the original anti‑slip tape wears out, especially for families with children, seniors, or pets. This guide explains how to remove the old tape, prepare the surface, and apply new LifeGrip Anti‑Slip Tape 2in or LifeGrip Anti‑Slip Tape 4in safely and efficiently. By following the instructions, readers will achieve a durable, high‑traction surface without damaging the carpet or underlying stair material.
The process combines proven preparation techniques—cleaning with isopropyl alcohol, heat‑gun activation, and pressure rolling—with product features such as PET durability and 80‑grit aluminum‑oxide traction. The result is a slip‑free stairway that retains its aesthetic appeal and meets safety standards for indoor and outdoor environments.
What You’ll Need
- LifeGrip Anti‑Slip Tape 2in (or 4in version) – $7.99, 4.7★/5 (2,598 reviews)
- YYXLIFE Double‑Sided Carpet Tape – $9.97, 4.6★/5 (55,801 reviews)
- Isopropyl alcohol (90% or higher) and a clean lint‑free cloth
- Heat gun (optional but recommended for best adhesion)
- 2‑inch rubber roller or a flat wooden block for pressure
- Utility knife or sharp scissors
- Protective gloves and safety glasses
Step 1 – Remove the Existing Tape
Begin by gently peeling away the worn LifeGrip tape. Use a plastic scraper to lift the edge, then pull steadily to avoid tearing the carpet fibers. If residue remains, apply a small amount of isopropyl alcohol to a cloth and rub the area; the alcohol dissolves adhesive without harming PET‑based tape or carpet backing.
Why this matters: The original tape’s acrylic adhesive can become brittle, leaving fragments that compromise the new tape’s bond. Thorough removal ensures a clean substrate for the new anti‑slip surface.
Step 2 – Clean and Dry the Stair Surface
Wipe each stair tread with a cloth saturated with 90% isopropyl alcohol. This removes dust, wax, and any lingering adhesive. Allow the surface to air‑dry for at least five minutes; the alcohol evaporates quickly, leaving a residue‑free surface.
Professional installers often recommend a final inspection under bright light to confirm no particles remain. A clean surface maximizes the PET tape’s tensile strength and prevents premature delamination.
Step 3 – Choose the Appropriate Width of LifeGrip Tape
If the stairs are narrow (under 6 inches), the LifeGrip Anti‑Slip Tape 2in provides sufficient coverage while remaining discreet. For wider treads or for added visual safety, the LifeGrip Anti‑Slip Tape 4in offers a broader grip area.
Both products are made from PET material, granting superior durability and resistance to temperatures ranging from -20°C to 60°C. Their hypo‑allergenic 80‑grit aluminum‑oxide pad delivers high traction without sacrificing comfort, a critical factor for families with elderly members.
Step 4 – Cut the Tape to Length
Measure each tread’s length and add a half‑inch overlap at the ends to ensure full coverage. Use a utility knife or sharp scissors to cut the tape; the 2‑inch version can be trimmed with a standard kitchen scissor, while the 4‑inch version may benefit from a rotary cutter for clean edges.
Tip: Cut a small test piece and apply it to a hidden area of the stair to verify adhesion before committing to the full length.
Step 5 – Warm the Surface (Optional but Recommended)
Pre‑heat the stair surface with a heat gun set to low (around 150°F). Move the gun continuously to avoid scorching the carpet fibers. Warmed surfaces improve the acrylic adhesive’s tackiness, as confirmed by a reviewer who achieved “exceptionally strong adhesion after using a heat gun and roller.”
Do not exceed 200°F, as excessive heat could damage carpet backing. A brief 10‑second pass per foot is sufficient.
Step 6 – Apply the LifeGrip Tape
Peel back a small portion of the tape’s protective backing and align it with the stair’s edge. Gradually remove the rest of the backing while pressing the tape onto the carpet. Use a 2‑inch rubber roller to apply even pressure across the entire length, ensuring the tape conforms to any slight carpet texture.
The thick acrylic adhesive forms a waterproof bond to smooth surfaces, including carpet underlay, concrete, wood, and tile. This bond remains effective even after repeated exposure to moisture, such as during cleaning.
Step 7 – Secure the Edges with Double‑Sided Carpet Tape
For added security, especially on high‑traffic stairs, apply a thin strip of YYXLIFE Double‑Sided Carpet Tape along the outer edge of the LifeGrip tape. This creates a secondary grip that prevents lifting at the corners.
YYXLIFE’s market‑leading adhesion holds firmly yet removes cleanly, leaving no residue—a crucial advantage when future renovations are planned. Apply the double‑sided tape after the LifeGrip tape has settled for at least 24 hours to ensure maximum bond strength.
Step 8 – Allow Curing Time
Let the newly installed tape cure for 24‑48 hours before subjecting the stairs to heavy foot traffic. During this period, avoid cleaning the stairs or exposing them to water.
Patience at this stage prevents premature edge lifting and guarantees the PET material’s full tensile strength is realized.
Tips & Pro Tips
- Use a heat gun in conjunction with a rubber roller for the strongest initial bond.
- When cutting tape, measure twice and cut once to avoid waste.
- For stairs with uneven carpet backing, press the tape into crevices with a thin wooden spatula before rolling.
- Store any leftover LifeGrip tape in a cool, dry place; PET retains its properties for years.
- If you need a wider coverage area, combine the 2‑inch and 4‑inch tapes on the same tread for a staggered pattern.
Troubleshooting
| Problem | Possible Cause | Solution |
|---|---|---|
| Tape lifts at edges after a day | Insufficient pressure or dirty surface | Re‑clean the area, re‑apply heat, and roll firmly for 30 seconds. |
| Residual adhesive on carpet | Old tape not fully removed | Apply additional isopropyl alcohol, let sit 2 minutes, then wipe. |
| Uneven traction feel | Air bubbles trapped under tape | Use a credit card or flat tool to push bubbles toward the edge before the adhesive sets. |
Conclusion
Replacing worn LifeGrip stair tape on carpeted stairs is a straightforward process when proper preparation, quality materials, and careful installation are employed. By following the eight steps outlined above, readers will achieve a slip‑resistant stairway that protects occupants and preserves the carpet’s appearance. The combination of LifeGrip’s PET‑based anti‑slip tape and YYXLIFE’s double‑sided carpet tape delivers a durable, residue‑free solution suitable for any household.
Maintain the stairs by inspecting the tape annually and re‑applying a fresh strip of double‑sided tape if wear becomes apparent. With these practices, the stair safety upgrade will last for years, providing peace of mind for families, seniors, and pets alike.
Frequently Asked Questions
How do I safely remove old LifeGrip stair tape from carpeted stairs?
Peel off the tape slowly, use a heat‑gun or hair dryer to soften the adhesive, and clean any residue with isopropyl alcohol.
What tools and materials are required for reinstalling LifeGrip anti‑slip tape?
You’ll need a utility knife, heat‑gun, isopropyl alcohol, a pressure roller, and the new LifeGrip 2‑in or 4‑in tape.
Can LifeGrip anti‑slip tape be applied to both carpeted and wooden stairs?
Yes, the tape adheres to carpet, wood, and other stair surfaces when properly cleaned and pre‑heated.
How long can I expect the new LifeGrip tape to last on carpeted stairs?
When installed correctly, the tape typically maintains traction for 2‑3 years under normal household traffic.
Is LifeGrip anti‑slip tape safe for children, seniors, and pets?
The 80‑grit aluminum‑oxide surface provides high traction while remaining gentle on feet and paws, making it suitable for all users.