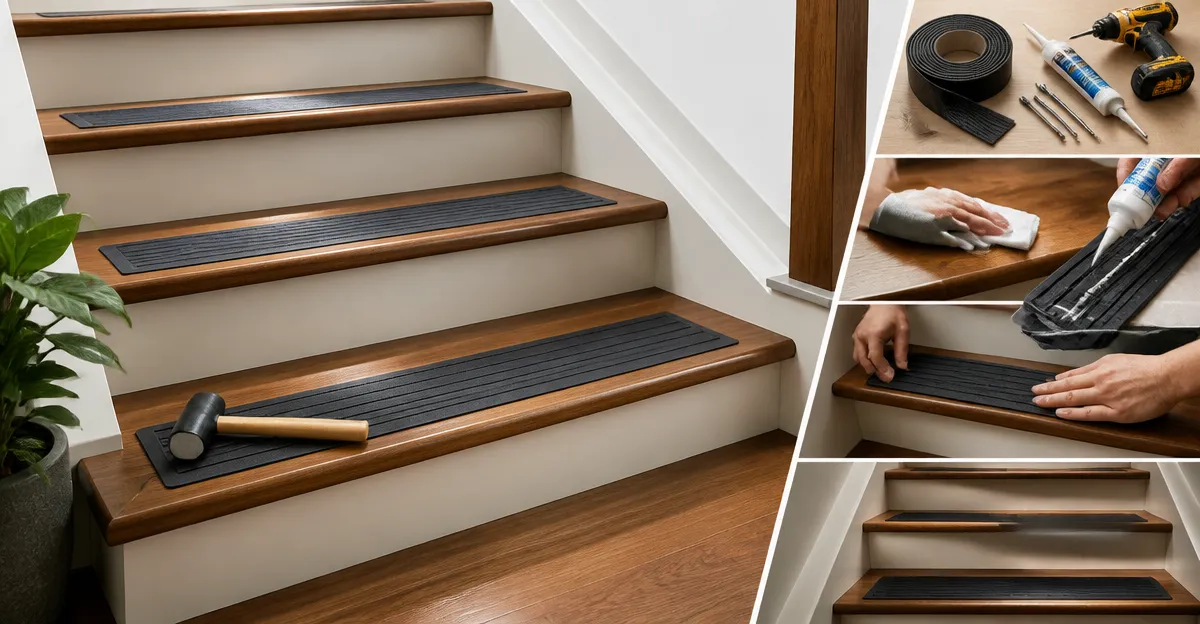
How to Reduce Stair Noise When Adding Anti‑Slip Treads: DIY Tips to Eliminate Squeaks
Introduction
Homeowners often discover that new anti‑slip treads improve safety but introduce an unwanted chorus of squeaks. This guide explains how to prepare, install, and fine‑tune stair treads so that the only sound heard is the gentle footfall of confident steps. Readers will learn practical preparation techniques, product selections, and troubleshooting methods that address both noise and durability. The information is valuable because it prevents costly re‑work, protects flooring, and creates a quieter living environment for families, pets, and guests.
The approach combines sound‑absorbing materials, proper adhesion, and systematic tightening of fasteners. By following the steps, one can achieve a professional finish without hiring a contractor. The guide also highlights affordable Amazon products that serve as reliable tools for each phase of the project.
What You’ll Need
- Cleaning supplies: mild detergent, microfiber cloths, and a vacuum.
- Measuring tape and pencil for precise placement.
- Utility knife or scissors for trimming treads.
- Wood filler or silicone caulk for filling gaps.
- Anti‑vibration pads or felt strips (optional for extra sound dampening).
- One of the recommended anti‑slip tread products (first mention linked below).
- Adhesive‑enhancing primer for wooden stairs (optional).
All of these items are readily available at hardware stores or online. The following sections integrate specific products that simplify the process while maintaining a high safety standard.
Step 1: Inspect and Secure the Existing Stair Structure
Before applying any tread, it is essential to verify that the stair stringers, risers, and treads are structurally sound. Loose nails, squeaky joints, or cracked wood will continue to produce noise even after new coverings are installed. Use a screwdriver to tighten any visible fasteners and apply wood filler to minor cracks. Allow the filler to cure according to the manufacturer’s instructions.
Why this matters: A stable substrate provides a solid foundation for adhesive‑backed treads, preventing movement that generates squeaks. If the underlying structure is not addressed, later steps will only mask the problem temporarily.
Step 2: Clean the Stair Surfaces Thoroughly
Dust, grease, and residual finish reduce the effectiveness of the adhesive on most anti‑slip products. Begin by vacuuming each stair to remove loose debris. Follow with a solution of warm water and a few drops of mild detergent. Wipe the surface with a microfiber cloth, then rinse with a clean damp cloth. Allow the stairs to dry completely; a fan or open windows can accelerate drying.
Professional tip: For painted or lacquered wood, a light sanding (120‑grit) improves adhesion without damaging the finish. Remove sanding dust with a vacuum before proceeding.
Step 3: Choose the Appropriate Anti‑Slip Tread
Different stair configurations benefit from distinct tread designs. For wooden or tile stairs where a low‑profile solution is desired, Cosy Homeer Stair Treads provide a 28" × 9" non‑slip mat made of 100 % polyester with a TPE backing. The product costs $23.99, holds a 4.7‑star rating from 8,585 reviews, and is praised for easy installation and strong grip on both wood and ceramic tile. The thin profile ensures that door clearances remain unaffected while delivering a reliable anti‑slip surface.
For larger areas or outdoor steps, LifeGrip Anti‑Slip Tape offers a 4" × 15' strip made from PET material with an 80‑grit aluminum oxide traction pad. Priced at $7.99 and rated 4.6 stars from 14,816 reviews, this tape adheres to concrete, metal, wood, and tile, making it a versatile choice for stair edges, risers, or landing pads. Its weather‑resistant acrylic adhesive ensures durability in extreme temperatures.
When a carpeted appearance is preferred, MBIGM Carpet Stair Treads deliver an 8" × 30" polyester‑fiber carpet with a TPU non‑skid bottom. At $41.99 and a 4.6‑star rating from 8,697 reviews, these treads combine softness, quietness, and easy removal without residue. They are especially useful in basements or indoor stairways where sound absorption is a priority.
For a high‑visibility solution that also glows in low light, LifeGrip Traction Treads provide a 6" × 32" strip with a photoluminescent stripe. Priced at $24.99 and rated 4.6 stars from 6,699 reviews, these treads are ideal for outdoor decks or entryways where safety and aesthetic appeal intersect.
Finally, KOOTETA Stair Treads present an 8" × 30" polyester mat with TPR self‑adhesive technology. At $39.99 and a 4.6‑star rating from 3,260 reviews, they are engineered for easy removal, washing, and a quiet walking experience.
Select the product that matches the stair material, desired appearance, and budget. The following steps assume the use of Cosy Homeer Stair Treads for illustration, but the same principles apply to the other options.
Step 4: Apply an Adhesive Primer (Optional but Recommended)
On older wood or glossy finishes, an adhesive primer improves bonding strength. Apply a thin, even coat using a brush and allow it to become tacky (approximately 10‑15 minutes). The primer does not alter the color of the stair and dries clear. This step reduces the likelihood of future slippage and minimizes squeak generation caused by micro‑movement between the tread and the stair.
Why it matters: Even the best‑rated anti‑slip products can lose adhesion over time if the underlying surface is too smooth. A primer creates a micro‑texture that the tread backing can grip more securely.
Step 5: Position and Install the Anti‑Slip Treads
- Measure each stair’s width and mark the center line with a pencil.
- Peel the protective film from the backing of the Cosy Homeer Stair Treads. Hold the tread by the edges to avoid contaminating the adhesive.
- Align the tread with the center line and press firmly from the middle outward, ensuring full contact with the stair surface.
- Use a clean roller or the flat side of a wooden spoon to smooth out air bubbles and achieve uniform pressure.
- If the tread extends beyond the stair edge, trim the excess with a utility knife, following the marked line.
For tape products such as LifeGrip Anti‑Slip Tape, cut the required length, peel the backing, and apply in overlapping strips to cover the entire tread surface. Press firmly and smooth with a roller.
Installation time per stair typically ranges from two to five minutes, depending on the chosen product and the need for trimming.
Step 6: Add Sound‑Dampening Materials (Optional)
If squeaks persist after tread installation, consider placing thin felt or rubber pads between the stair and the tread. These pads absorb vibration and reduce resonance. Cut the pads to match the tread dimensions and adhere them with a thin layer of spray adhesive before applying the anti‑slip product.
Products such as anti‑vibration felt strips are inexpensive and can be found at most hardware retailers. The additional layer does not affect the tread’s grip but enhances acoustic performance.
Step 7: Test and Adjust
After all treads are installed, walk up and down each step with both shoes and bare feet. Listen for any lingering squeaks. If a specific stair still produces noise, gently lift the tread, re‑clean the surface, and re‑apply the adhesive backing, ensuring no dust remains. For tape products, verify that the edges are fully sealed; any gap can allow movement that creates sound.
Document any adjustments in a notebook for future reference, especially if multiple staircases are being treated in the same residence.
Tips & Pro Tips
- Work in a well‑ventilated area when using adhesives or primers to avoid inhaling fumes.
- Do not rush the drying process; allow at least 24 hours before heavy foot traffic.
- When trimming polyester carpet treads, use sharp scissors to avoid fraying the edges.
- For outdoor stairs, choose a product with UV‑resistant backing such as LifeGrip Traction Treads to prevent fading.
- Regularly vacuum the installed treads to keep the surface free of grit that can re‑activate squeaking.
Troubleshooting
| Problem | Possible Cause | Solution |
|---|---|---|
| Squeak persists after installation | Loose sub‑floor or insufficient adhesive contact | Re‑tighten stair fasteners, re‑clean surface, and re‑apply tread with extra pressure. |
| Tread lifts at edges | Improper surface preparation or humidity | Dry the stairs thoroughly, use a primer, and ensure edges are pressed for at least 30 seconds. |
| Adhesive residue remains after removal | Using a product not designed for easy removal | Choose a removable option such as KOOTETA Stair Treads which promises no residue. |
Conclusion
Reducing stair noise while adding anti‑slip treads requires careful preparation, appropriate product selection, and diligent installation. By inspecting the stair structure, cleaning thoroughly, selecting a suitable tread, and optionally adding sound‑dampening layers, one can achieve a quiet, safe stairway that lasts for years. The recommended Amazon products provide reliable performance, high customer satisfaction, and cost‑effective solutions for a variety of stair types. Implement the steps outlined in this guide, and the homeowner will enjoy confidence in every step without the distraction of unwanted squeaks.
Products Mentioned in This Guide
Frequently Asked Questions
Why do anti‑slip treads cause squeaking on stairs?
Squeaks occur when the tread isn’t fully bonded to the stair surface or when fasteners are loose, allowing vibration between the layers.
What is the best preparation step to prevent stair noise before installing treads?
Thoroughly clean and dry the stair surface, then sand any glossy finish to create a roughened substrate for better adhesion.
Which adhesive type works best for quiet, long‑lasting anti‑slip tread installation?
A high‑bond construction adhesive or a polyurethane‑based glue provides strong, flexible bonding that dampens movement.
How can I tighten fasteners without damaging the tread material?
Use a screwdriver or drill with a torque setting just enough to snug the screw, then add a small washer or silicone bead to distribute pressure.
Are there any inexpensive products that help absorb stair noise?
Applying a thin layer of acoustic underlayment or self‑adhesive felt pads beneath the tread can significantly reduce vibrations at low cost.