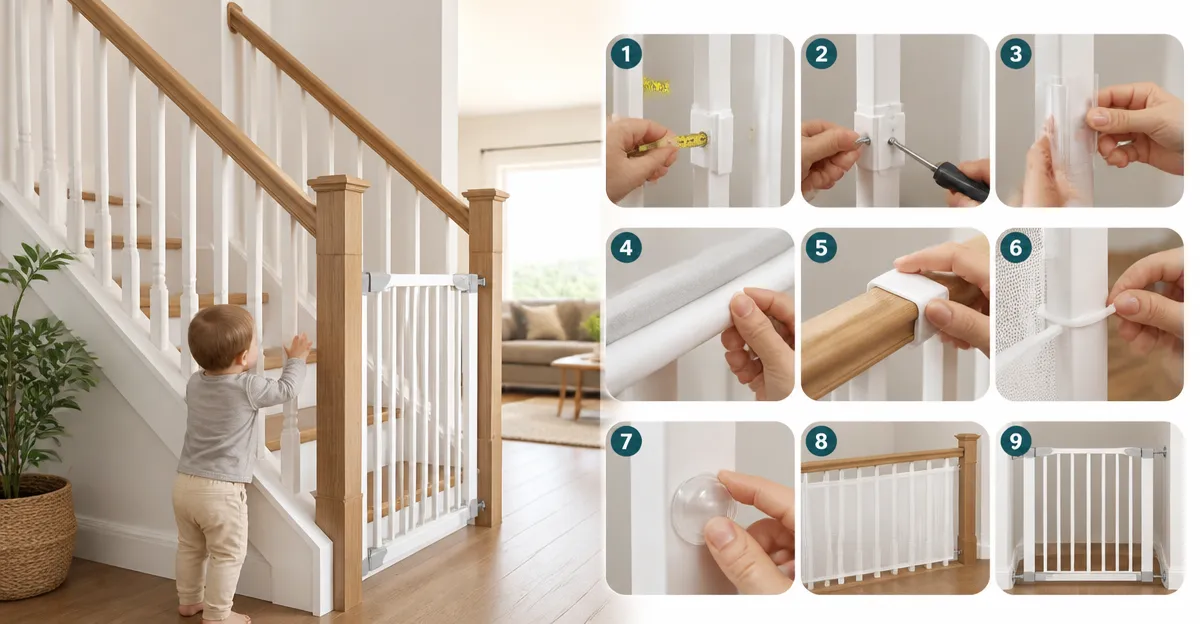
How to Childproof Stair Railings and Balusters: 9 Simple DIY Steps to Babyproof Your Stairs
Introduction
Every parent knows that stairs present a significant hazard for curious toddlers. This guide explains nine clear, actionable steps that transform ordinary stair railings and balusters into a safe barrier. Readers will learn how to assess their staircase, select the right safety gate, install it correctly, and maintain the protection over time. The information is valuable because it reduces the risk of falls, protects both children and pets, and offers flexible solutions for renters and homeowners alike.
What You’ll Need
- Measuring tape
- Level
- Screwdriver or drill (optional for hardware mounting)
- Wall‑cup pressure mounts or hardware mounting kit (included with most gates)
- Safety gate – recommended options are listed in the steps below
- Optional baluster covers, corner guards, and anti‑slip tread
Step 1: Measure Your Stair Opening
Begin by measuring the width of the stair opening at the top and bottom. Use a metal measuring tape and record the smallest measurement; this determines the gate size you will need. Measure both the top and bottom because many staircases taper. Write down the dimensions in inches; most baby gates list a range, such as 29‑38.5 inches for the Regalo Easy Step Baby Gate. Accurate measurement prevents the need for costly returns.
Step 2: Choose the Appropriate Gate Type
Based on the measurement, decide which gate best fits your opening and lifestyle:
- Standard openings (29‑38.5"): The Regalo Easy Step Baby Gate offers a durable all‑metal frame, a walk‑through door, and a price of $44.98 with a 4.5‑star rating from 174,099 reviews.
- Wider openings (up to 49"): The Regalo Extra Wide Baby Gate expands to 49" and costs $49.99, also rated 4.5 stars.
- Auto‑close convenience: The Cumbor Auto Close Baby Gate closes automatically, measures $89.99, and holds a 4.6‑star rating from 21,325 reviews.
- Renters or temporary setups: The DUMOS Auto Close Baby Gate uses pressure mounts with double‑sided tape, costs $34.99, and is rated 5 stars.
Choosing a gate that matches the opening width and your preference for auto‑close versus manual operation simplifies later steps.
Step 3: Install a Pressure‑Mount Gate (Basic Installation)
If your staircase has sturdy door frames, a pressure‑mount gate provides a non‑invasive solution. Follow these actions:
- Place the gate at the measured height, ensuring the walk‑through door faces the direction of traffic.
- Insert the supplied wall cups into the top and bottom of the gate frame.
- Press the gate firmly against the wall until the cups lock into place. Use a level to confirm the gate is vertical.
- Adjust the tension bolts until the gate does not wobble.
The Regalo Easy Step Baby Gate includes wall cups and a simple pressure‑mount system, making it ideal for this step. Its metal construction ensures the gate remains stable under everyday use.
Step 4: Upgrade to a Hardware‑Mount for Staircases
When the stair railing is a high‑traffic area, a hardware‑mount provides extra security. Use the following procedure:
- Mark the drilling points on the wall or baluster using the gate’s mounting template.
- Pre‑drill pilot holes, then insert the supplied screws and anchors.
- Attach the gate’s mounting brackets to the screws, tightening until the gate is firmly anchored.
- Test the gate by applying pressure; it should not shift.
The Cumbor Auto Close Baby Gate includes both pressure‑mount and hardware‑mount options, along with Y‑Bolt adapters for banisters. Its double‑lock design and auto‑close feature add a layer of safety that is especially useful on stairs.
Step 5: Add Baluster Covers or Corner Guards
Even with a gate installed, exposed balusters can become climbing points. Purchase plastic or rubber baluster covers that snap over the vertical posts. These covers are inexpensive and can be found at most hardware stores. They prevent toddlers from gripping the balusters and pulling themselves up.
For added protection, consider corner guards on any sharp edges. Secure them with adhesive strips to avoid drilling into the stair structure.
Step 6: Install Handrail Extensions or Protective Caps
If the handrail is lower than the gate height, install a protective cap that extends the rail upward. This reduces the chance of a child climbing the rail to reach the gate. Use a cap that matches the rail’s material (wood or metal) and secure it with the provided brackets.
Step 7: Apply Anti‑Slip Tread to Stair Steps
Stair steps can become slippery, especially when a child is learning to walk. Apply adhesive anti‑slip tape or rubber tread to the first three steps leading to the gate. This improves traction and reduces the likelihood of a slip‑and‑fall incident.
Step 8: Test Gate Operation and Child Safety
After installation, perform a thorough test:
- Open and close the gate repeatedly with one hand to simulate daily use.
- Attempt to lift the gate; it should remain firmly in place.
- Check the latch mechanism: it must require a deliberate thumb press and lift, as described for the Cumbor Auto Close Baby Gate double‑lock.
- Verify that the gate does not open when pressure is applied from the child’s side.
Document any adjustments needed and tighten the tension bolts accordingly.
Step 9: Maintain and Inspect Regularly
Safety is an ongoing process. Conduct a monthly inspection to ensure:
- All screws and bolts remain tight.
- Wall cups or pressure points have not shifted.
- Latch and auto‑close mechanisms operate smoothly.
- No cracks or deformation appear in the gate frame.
If any component shows wear, replace it promptly. The DUMOS Auto Close Baby Gate includes spare zip ties for belt repairs, illustrating the importance of having replacement parts on hand.
Tips & Pro Tips
- Always install the gate at least 30 inches above the floor to prevent a child from climbing over.
- Use a level during installation; an uneven gate can stress the latch.
- When using pressure mounts on drywall, place a thin piece of wood behind the cup to distribute pressure and avoid dents.
- For homes with pets larger than medium size, consider a gate with a higher weight rating; the Regalo Extra Wide model offers a sturdier frame for added durability.
- Label the gate’s latch side with a small sticker to remind adults which way it should swing.
Troubleshooting
| Problem | Possible Cause | Solution |
|---|---|---|
| Gate does not stay closed | Insufficient tension on pressure bolts | Increase bolt tension until the gate holds firmly; verify wall cups are fully engaged. |
| Latch is difficult to open | Latch spring may be misaligned | Adjust the latch lever according to the manual; ensure the gray rubber safety piece is seated correctly. |
| Gate wobbles after several weeks | Screws have loosened | Tighten all mounting screws; consider switching to hardware mount for added stability. |
Conclusion
By following these nine steps, one can transform any staircase into a child‑friendly zone without compromising aesthetics. Measuring accurately, selecting the right gate, and installing it securely are the foundation of effective stair safety. Ongoing maintenance ensures the protection lasts as the child grows. Implement these practices today to enjoy peace of mind and a safer home environment.
Products Mentioned in This Guide
Frequently Asked Questions
What is the best type of safety gate for stair railings?
A pressure‑mounted gate with a metal frame is ideal for renters, while a hardware‑mounted gate offers the strongest, permanent protection.
How do I measure my stair opening correctly?
Measure the narrowest width at both the top and bottom of the stairs, then use the smallest measurement to select a gate that fits.
Can I install a childproof gate without drilling?
Yes, pressure‑mount or tension‑mount gates attach to the balusters or wall without screws, making them suitable for apartments.
Do I need baluster covers in addition to a safety gate?
Baluster covers add extra protection by preventing toddlers from squeezing through gaps, especially on wide‑spaced railings.
How often should I check the gate’s security?
Inspect the gate weekly for loose screws, worn pads, or misalignment and tighten or replace parts as needed.